Recommended Posts

I Can Never Lose in these Two Rule Sets
2 comments
This post was made as entry for Splinterlands Community Engagement Challenge
━━━━━━━━━━━━━━━━━━━━━━━━━━━━━━━━━━━━━━━━━━
Anyone familiar with that thing above? If you said yes, then you are a real gamer. That thing above is what you call a cheat code. A cheat code is something you use in a game to give you an advantage, to make your life easier, win faster, with less effort. What would you do if I say I have the same thing in Splinterlands?
There are two rule sets I can never ever lose in Frontier Mode, Back to Basics and Equal Opportunity rule sets. I will give you my own cheat code to never lose in these two rule sets.

🚀 The Secret to Back to Basics Rule Set
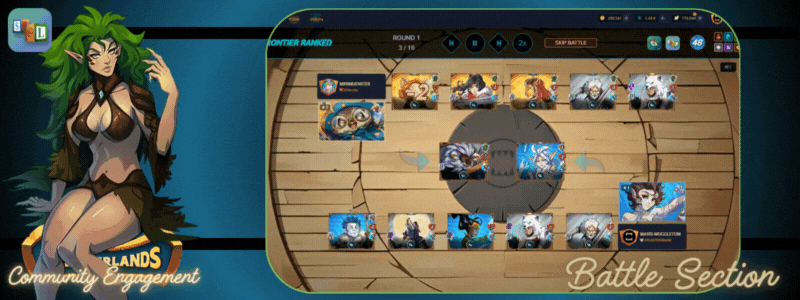
I have two battles below and they both share the same strategy, Marlai Singariel. Marlai Singariel is a Water Archon from the Frontier Mode that gives extra +1 magic attack. Back to Basics rule sets removes all unit's abilities. This means the battle will just be what I call a stat check.
If your units have better stats, you win. It's that simple. And in this rule set, Magic attack is your best friend. Not only it does not miss, it also bypasses any armor directly attacking enemy health. The higher magic attack your team have, you also have the higher win chance.
Back to Basics removes all complicated abilities like Sneak, Snipe, Opportunity and Aimless keeping your magic attack units safe. Make sure to keep the highest attack units at the every last.
Lastly, while I am using Frontier Mode battle as an example, you can also use the same idea with the other archons in other game modes like Obsidian, Lorkus, or Alric Stormbringer.
Lineup:
Marlai Singariel (Archon) - Needed in this build in order to increase my magic attacks and gain the advantage. There's no Silence ability among Foundation units making Marlai Singariel really strong in Frontier Mode.
Asel Alagosdil - A strong 4 mana unit for Water element. You need to get it first through winning games in Frontier Mode.
Great Bear Druid - I put him in the secondary position to serve as a secondary tank. While the melee part cannot attack, he can still use his magic attacks.
Water-Logged Wizard - This is an extra magic attack unit, nothing special.
Lunaki Howler - This is an extra magic attack unit, nothing special.
Frostguard Warrior - If I have another magic attack unit, that unit would be in this position but for now, Frostguard Warrior can be the substitute.
Summary:
Similar to the other one, Marlai Singariel and her team of magic attackers gave me the win. I got a really good unit Asel Alagosdil, which has decent stats for a 4 mana as a Foundation unit that gave me an advantage. Without her, I might do something similar to my enemy's build which lacks a tank and that is a problem.
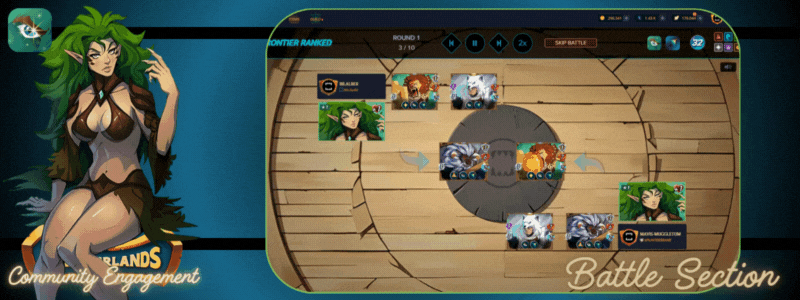
Lineup:
Marlai Singariel (Archon) - Needed in this build in order to increase my magic attacks and gain the advantage. There's no Silence ability among Foundation units making Marlai Singariel really strong in Frontier Mode.
Asel Alagosdil - A strong 4 mana unit for Water element. You need to get it first through winning games in Frontier Mode.
Vengeful Monk - This could also be Port Guardian but I wanted more damage so I chose Vengeful Monk instead. But thinking about it now, Port Guardian is still better since the main damage is magic attacks from the other units.
Great Bear Druid - Can be placed in any position due to the magic attack.
Water-Logged Wizard - This is an extra magic attack unit, nothing special.
Lunaki Howler - This is an extra magic attack unit, nothing special.
Frostguard Warrior - If I have another magic attack unit, that unit would be in this position but for now, Frostguard Warrior can be the substitute.
Summary:
While the damage from the melee and range attacks were not as helpful because of the enemy's armor, my superior magic attacks worked well. My magic attack units may have been targeted first due to their low health, I still have Great Bear Druid to carry the whole game.
🚀 The Secret to Equal Opportunity Rule Set
Equal Opportunity gives Opportunity to all units. This ability changes the attack pattern of the unit to prioritize lowest health units first unless that unit is in the first position or have Scattershot ability (Scattershot overrides all targeting abilities). With this knowledge, you can actually control your enemy's action without the use of Taunt units.
For this strategy to work, you need to have a "bait" unit, a low health unit whose purpose is to take the attacks or a "carry" unit, whose purpose is to last the longest an carry you to victory. The good thing is that these two works side by side and is very easy to do.
In Frontier Mode, I like to use Great Bear Druid as my carry unit because of the two attacks and high health. The 6 health is high in Frontier Mode low levels so he's the one I prefer using. The rest of the team is the bait. As long as I have Great Bear Druid alive, I can win this rule set easy.
Lineup:
Aurelia (Archon) - The extra health from Aurelia is a good overall ability. It doesn't help as much but at times, that one extra health is the difference between winning and losing.
Dread Tafarian - While the attacks are not great, the tanking potential is there. Dread Tafarian is also good because of that Heal ability.
New Beluroc Aegis - Putting New Beluroc Aegis in the second position means that the enemy attacks would be split. Attacks from first position units does not get redirected by Taunt.
Great Bear Druid - You put him at the last position because Great Bear Druid can attack on any position with the Opportunity ability. The decent health also works good in order to avoid getting targeted by Opportunity attacks early.
Summary:
In this battle, my enemy and I have the same idea but I won due to the difference in position. My Dread Tafarian and New Beluroc Aegis share the damage since their New Beluroc Aegis attacks my Dread Tafarian while the other attacks the other tank. The enemy New Beluroc Aegis takes all the damage from my team.
Another thing to remember is that when enemies are using Opportunity attacks, the units in the front takes priority if some of the units have the same health. In this battle, assuming there's no New Beluroc Aegis, since Great Bear Druid and Dread Tafarian has both 6 health, Dread Tafarian will be targeted first for attacks because he is positioned in the front-most.
If there's 4 health units positioned in 2nd, 3rd, and 5th, the attack order target will be 2nd, 3rd, then 5th.
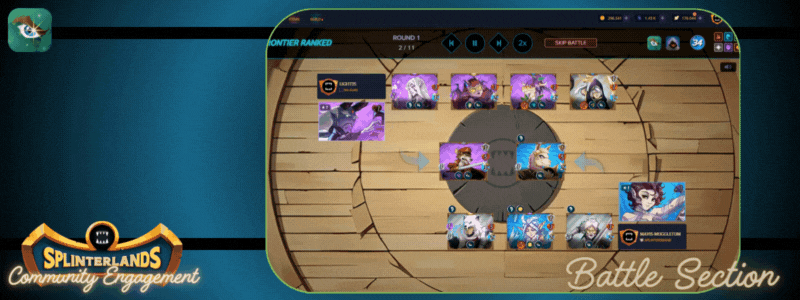
Lineup:
Marlai Singariel (Archon) - I can use melee units freely here because there's Silenced Archons rule set preventing any abilities from Marlai Singariel.
Port Guardian - Foundation unit's Water Element tank. The mix of decent health and armor is a good combination to resist attacks from any attack type.
Vengeful Monk - No armor but has good 2 damage instead. Vengeful Monk is a good secondary tank for Frontier Mode.
Asel Alagosdil - A strong 4 mana unit for Water element. You need to get it first through winning games in Frontier Mode but the grinding is worth the time.
Great Bear Druid - You put him at the last position because Great Bear Druid can attack on any position with the Opportunity ability. The decent health also works good in order to avoid getting targeted by Opportunity attacks early.
Summary:
Like in the last battle, always position the Great Bear Druid at the last. This allows you to maximize his dual attacks as Opportunity allows his melee attack to be used as well.
With this position, you also have a Sneak blocker giving you multiple defense with least effort. As long as you make sure that your units have less than 6 health and Great Bear Druid is positioned last, you will easily win in this rule set.
Disclaimer


━━━━━━━━━━━━━━━━━━━━━━━━━━━━━━━━━━━━━━━━━━━━

About the Author
Hey! I’m Mavis the Muggle, your friendly Splinterlands addict with a slight obsession for all things Harry Potter. 🧙
When I’m not immersed in gaming or wizardry, I’m busy learning new things. Recently, I’ve been having putting a lot of effort and having a blast creating content on Hive so relax!
You can support me by upvoting this post, reblogging, leaving a comment below or by using my Splinterlands .
 ║
║  ║
║ 
━━━━━━━━━━━━━━━━━━━━━
Comments